简介
NestJS是基于Node的后端框架,底层使用了Express作为HTTP服务框架(也可使用Fastify),对TypeScript有着非常良好的支持,上手也非常简单。本文意在通过一个简单的接口示例,帮助读者快速学会如何使用NestJS写接口。
前置概念
IoC 控制反转 与 DI 依赖注入
IoC,Inversion of Control,意为控制反转,旨在解耦组件之间的依赖关系。
在传统的编程模型中,组件之间的依赖关系由调用者来控制,即调用者创建并管理被调用者的实例。而在 IoC 的模式下,这种控制权被反转,由容器(通常是一个框架或容器库)负责创建和管理组件的实例,同时负责解决它们之间的依赖关系。
IoC 的核心思想是将组件之间的依赖关系的创建和解析过程委托给一个容器,调用者只需要声明它们的依赖关系,而不需要直接负责实例的创建和管理。容器负责根据依赖关系进行实例的创建、注入和生命周期的管理。
DI,Dependency Injection,依赖注入,是IoC的一种表现形式。
使用小满zs提供的一个例子:
未使用IoC:
1
2
3
4
5
6
7
8
9
10
11
12
13
14
15
16
17
18
19
20
| class A {
name: string
constructor(name: string) {
this.name = name
}
}
class B {
age:number
entity:A
constructor (age:number) {
this.age = age;
this.entity = new A('小满')
}
}
const c = new B(18)
c.entity.name
|
使用IoC:
1
2
3
4
5
6
7
8
9
10
11
12
13
14
15
16
17
18
19
20
21
22
23
24
25
26
27
28
29
30
31
32
33
34
35
36
37
38
39
40
41
42
| class A {
name: string
constructor(name: string) {
this.name = name
}
}
class C {
name: string
constructor(name: string) {
this.name = name
}
}
class Container {
modeuls: any
constructor() {
this.modeuls = {}
}
provide(key: string, modeuls: any) {
this.modeuls[key] = modeuls
}
get(key) {
return this.modeuls[key]
}
}
const mo = new Container()
mo.provide('a', new A('1'))
mo.provide('c', new C('2'))
class B {
a: any
c: any
constructor(container: Container) {
this.a = container.get('a')
this.c = container.get('c')
}
}
new B(mo)
|
示例中使用了一个容器container来收集依赖,供其他组件使用。
装饰器 @
装饰器分为类装饰器(Class Decorator),属性装饰器(Property Decorator),方法装饰器(Method Decorator),参数装饰器(Parameter Decorator),区别在于修饰的对象不同,接受的参数也不同。
1
2
3
4
5
6
7
8
9
10
11
12
13
14
15
16
17
18
19
20
21
22
23
24
25
26
27
28
29
30
31
32
33
34
35
36
37
38
39
40
41
42
43
44
45
46
47
48
49
50
51
52
53
54
55
56
57
58
59
60
61
62
63
| const CDecorator: ClassDecorator = (target: any) => {
target.prototype.name = "哈哈";
};
@CDecorator
class A {
constructor() {}
}
const a: any = new A();
console.log(a.name);
const PDecorator: PropertyDecorator = (target: any, key: string | symbol) => {
console.log(target, key);
};
const MDecorator: MethodDecorator = (
target: any,
key: string | symbol,
descriptor: any
) => {
console.log(target, key, descriptor);
};
const ParameterDecorator: ParameterDecorator = (
target: any,
key: string | symbol | undefined,
index: number
) => {
console.log(target, key, index);
};
class B {
@PDecorator
public name: string;
constructor() {
this.name = "";
}
@MDecorator
getName(@ParameterDecorator name: string) {
return this.name;
}
}
属性装饰器
{} name
参数装饰器
{} getName 0
方法装饰器
{} getName {
value: [Function: getName],
writable: true,
enumerable: false,
configurable: true
}
|
初始化项目
-
首先安装@nestjs/cli
1
| pnpm install -g @nestjs/cli
|
-
新建项目
-
启动项目(热更新)
查看是否启动成功:
1
2
3
| curl http://127.0.0.1:3000
Hello World!
|
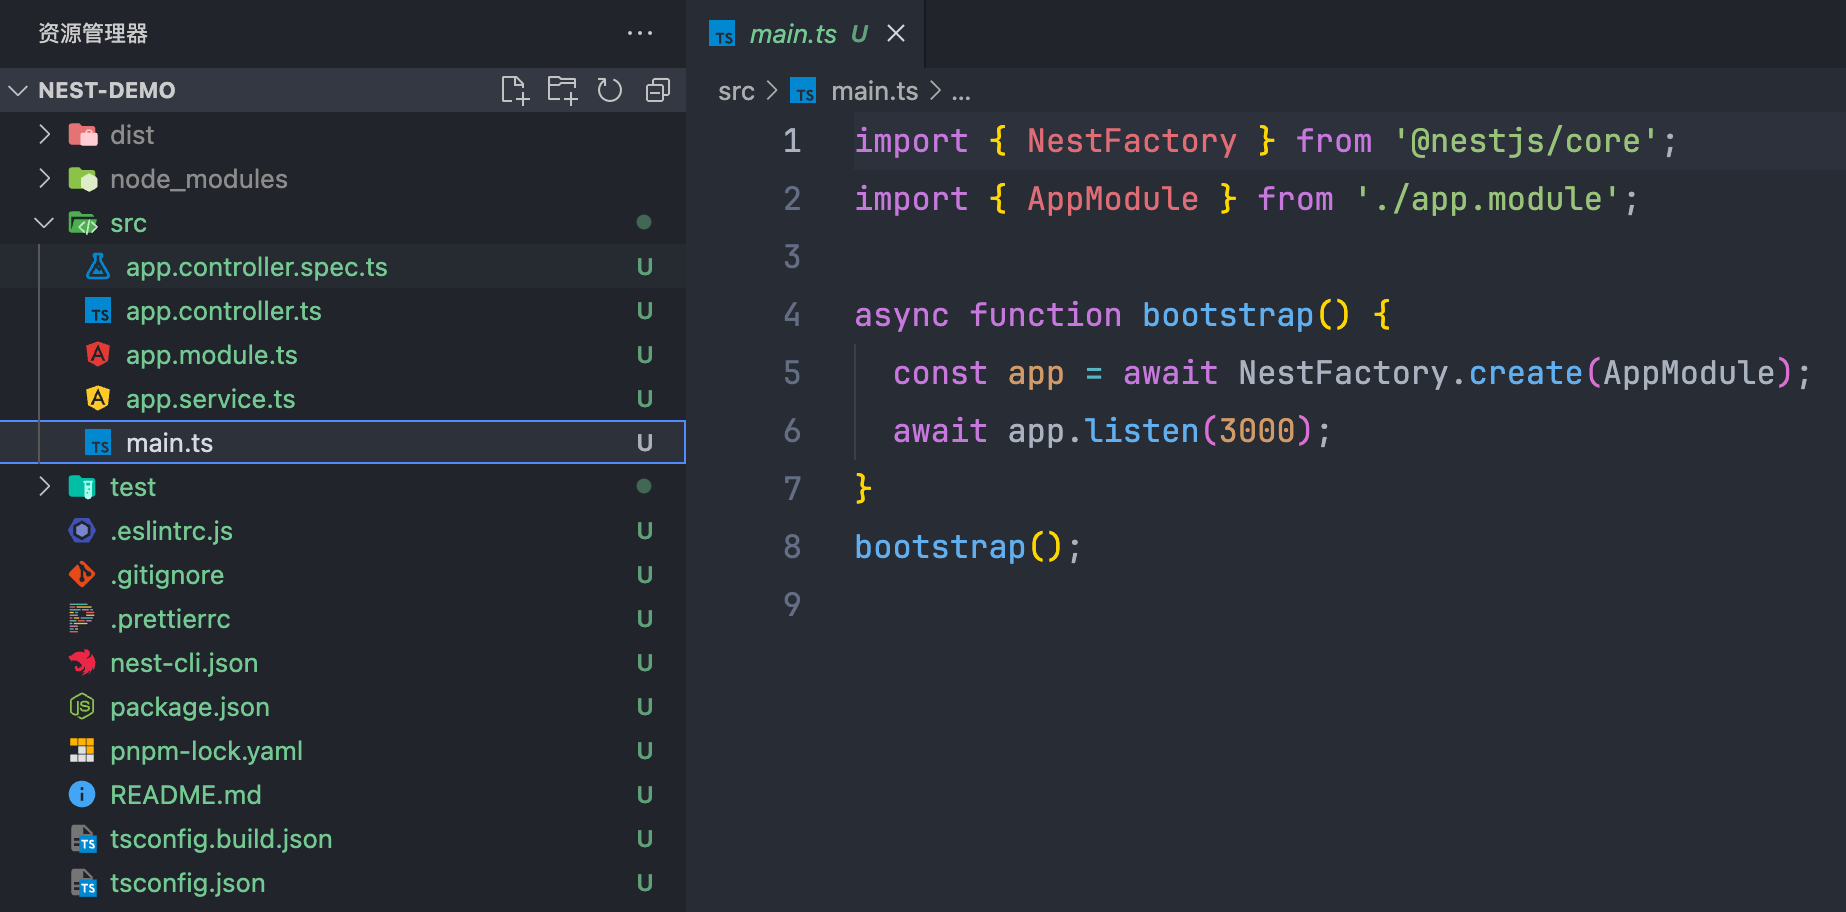
文件结构
| *.controller.spec.ts |
测试文件 |
| *.controller.ts |
controller 路由部分 |
| *.module.ts |
IoC 容器 |
| *.service.ts |
controller 逻辑部分 |
| main.ts |
入口 |
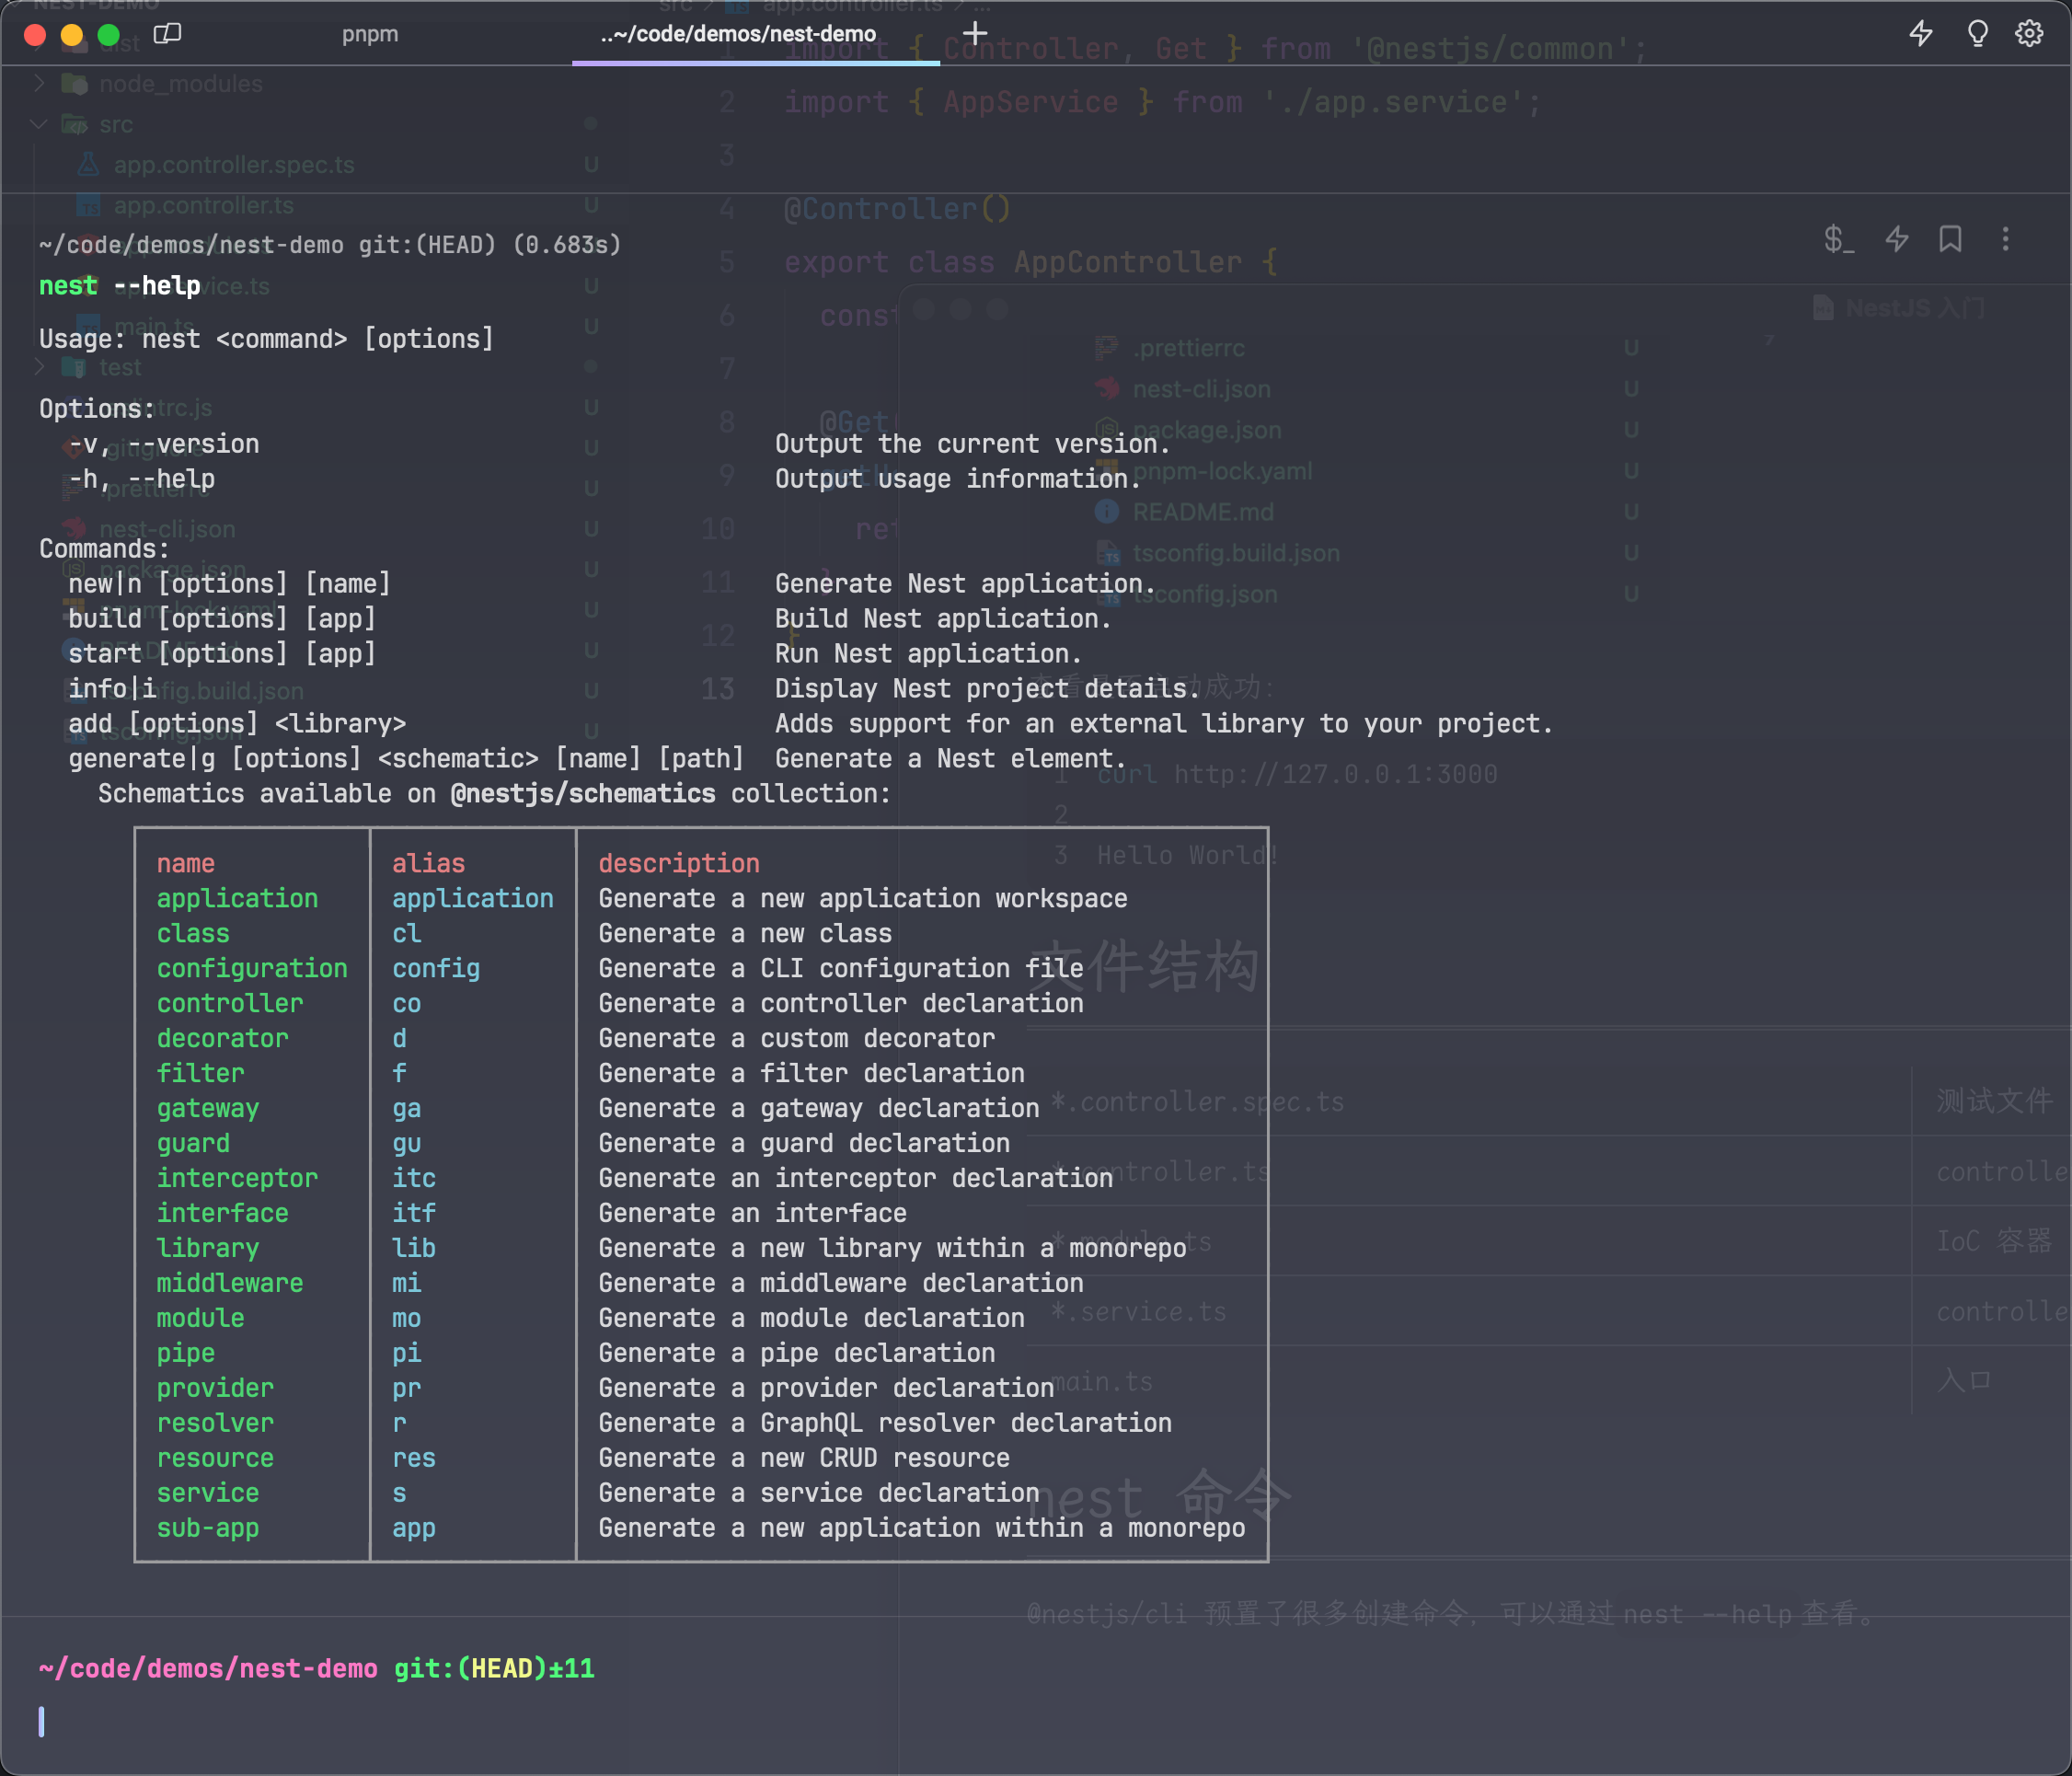
nest 命令
@nestjs/cli 预置了很多创建命令,可以通过nest --help查看。
可以通过nest g [name]来快速创建文件,例如
1
2
| nest g mo user
nest g co user
|
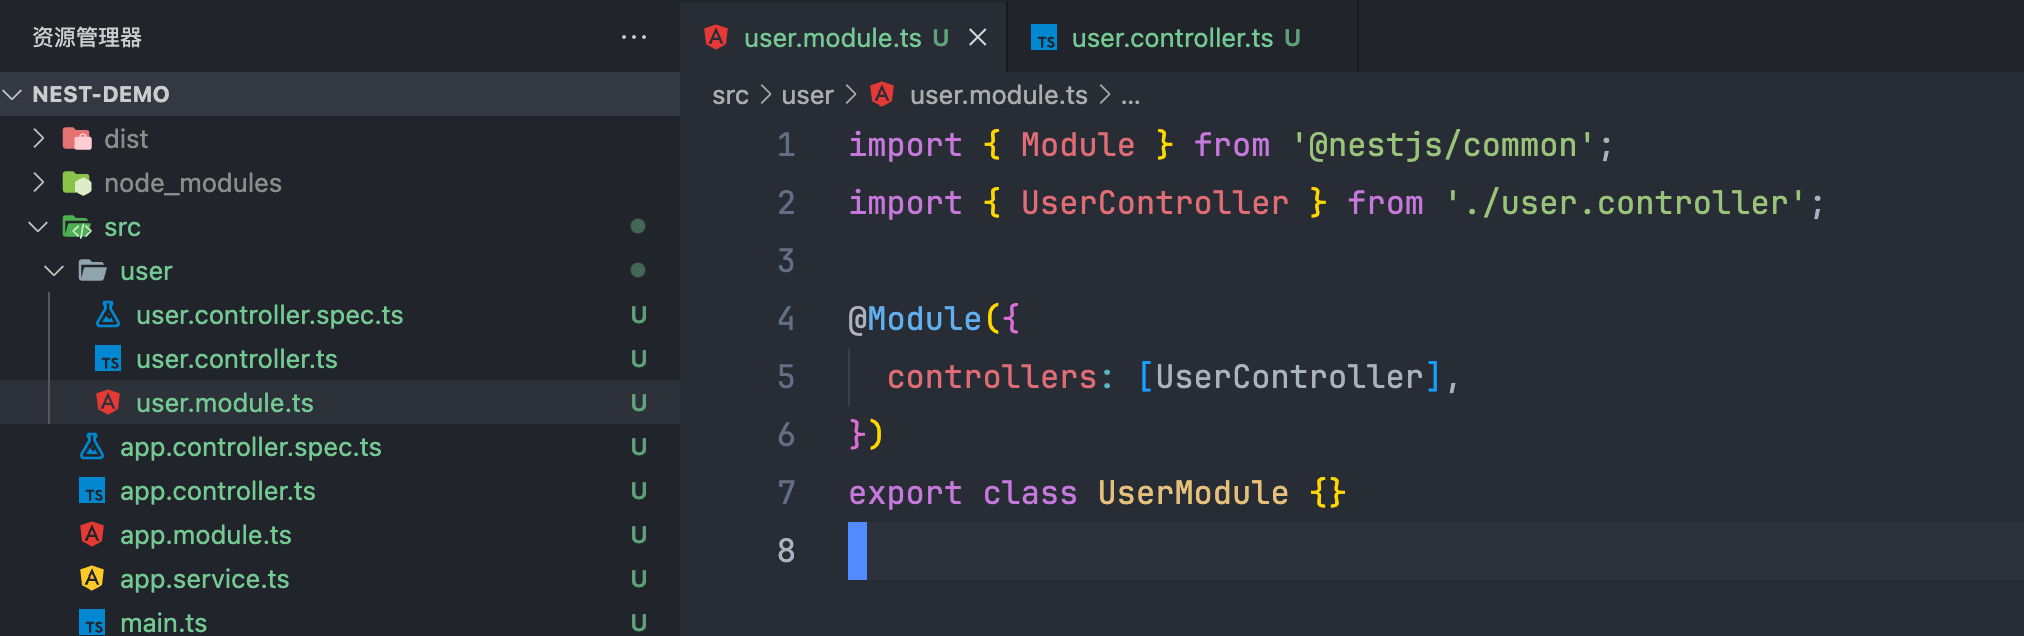
通过命令生成的文件,也会自动DI,例如这里我们创建了一个模块文件,后创建了一个控制器,后创建的控制器就自动注入到模块中了。
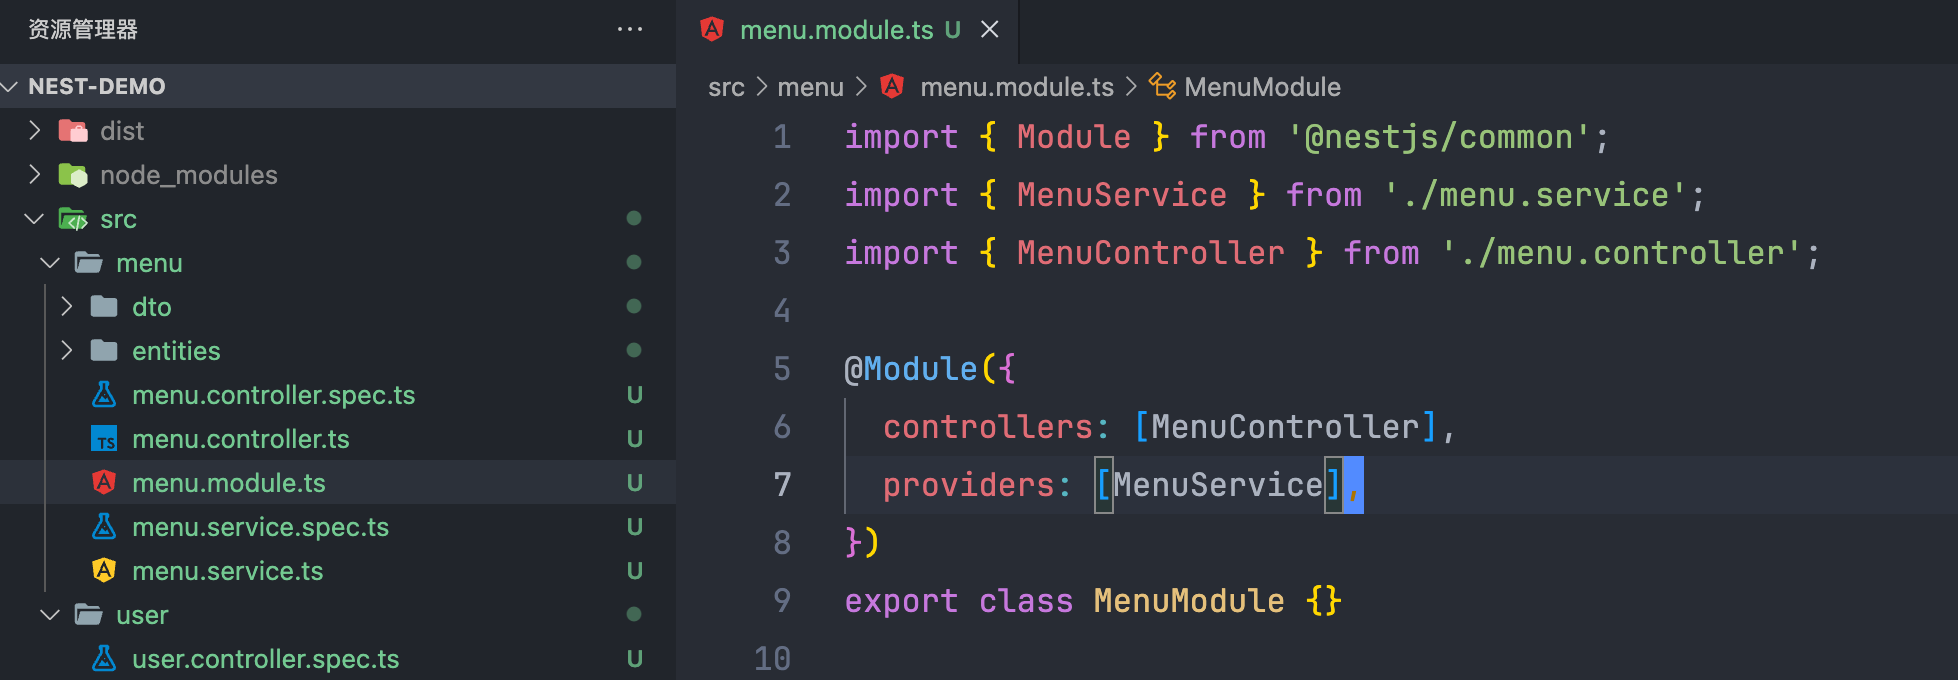
也可以通过nest g res [name]快速创建一整个模块,例如:
1
2
3
4
5
6
7
8
9
10
11
12
13
14
15
| nest g res menu
----------------------------------------------------
? What transport layer do you use? REST API
? Would you like to generate CRUD entry points? Yes
CREATE src/menu/menu.controller.spec.ts (556 bytes)
CREATE src/menu/menu.controller.ts (883 bytes)
CREATE src/menu/menu.module.ts (240 bytes)
CREATE src/menu/menu.service.spec.ts (446 bytes)
CREATE src/menu/menu.service.ts (607 bytes)
CREATE src/menu/dto/create-menu.dto.ts (30 bytes)
CREATE src/menu/dto/update-menu.dto.ts (169 bytes)
CREATE src/menu/entities/menu.entity.ts (21 bytes)
UPDATE package.json (1987 bytes)
UPDATE src/app.module.ts (369 bytes)
✔ Packages installed successfully.
|
Controller 控制器
1
2
3
4
5
6
7
8
9
10
11
12
13
14
15
16
17
18
19
20
21
22
23
24
25
26
27
28
29
30
31
32
33
34
35
| import { Controller, Get, Post, Body, Patch, Param, Delete } from '@nestjs/common';
import { UserService } from './user.service';
import { CreateUserDto } from './dto/create-user.dto';
import { UpdateUserDto } from './dto/update-user.dto';
@Controller('user')
export class UserController {
constructor(private readonly userService: UserService) {}
@Post()
create(@Body() createUserDto: CreateUserDto) {
return this.userService.create(createUserDto);
}
@Get()
findAll() {
return this.userService.findAll();
}
@Get(':id')
findOne(@Param('id') id: string) {
return this.userService.findOne(+id);
}
@Patch(':id')
update(@Param('id') id: string, @Body() updateUserDto: UpdateUserDto) {
return this.userService.update(+id, updateUserDto);
}
@Delete(':id')
remove(@Param('id') id: string) {
return this.userService.remove(+id);
}
}
|
参数装饰器
请求中往往会携带很多信息,我们可以通过参数装饰器便捷的获取我们需要的数据。
| @Param() |
路径参数 /user/:id |
| @Query() |
查询参数 /user?page=1&pageSize=5 |
| @Body() |
请求体 |
| @Headers() |
请求头 |
DTO 与数据校验
在 Nest.js 中,DTO(Data Transfer Object)是一种用于数据传输的对象,用于在不同层之间传递数据。DTO 可以包含一组属性,这些属性与数据传输相关,并且可以用于从客户端向服务器传递数据,或者在服务器内部的不同模块之间传递数据。

在 dto 文件中描述数据:
1
2
3
4
5
6
|
export class CreateUserDto {
username: string;
password: string;
}
|
我们略微改造一下逻辑作为示例:
1
2
3
4
5
|
async create(createUserDto: CreateUserDto) {
return createUserDto;
}
|
1
2
3
4
5
6
| curl --location --request POST 'http://localhost:3000/user' \
--header 'Content-Type: application/x-www-form-urlencoded' \
--data-urlencode 'username=1' \
--data-urlencode 'password=123'
--------------------------------------------------------
{"username":"1","password":"123"}%
|
此时并不会对数据进行验证,例如我们没传username:
1
2
3
4
5
| curl --location --request POST 'http://localhost:3000/user' \
--header 'Content-Type: application/x-www-form-urlencoded' \
--data-urlencode 'password=123'
--------------------------------------------------------
{"password":"123"}%
|
而我们希望将username和password作为必传项,因此需要进行数据验证。
NestJS 提供了 pipe(管道)来进行数据的转换和验证,在目前的情景下,我们使用 NestJS 自带的ValidationPipe结合class-validator就可以满足我们验证数据的需求。
首先我们在main.ts中全局注册管道ValidationPipe:
1
2
3
4
5
6
7
8
9
10
11
12
|
import { NestFactory } from '@nestjs/core';
import { AppModule } from './app.module';
import { ValidationPipe } from '@nestjs/common';
async function bootstrap() {
const app = await NestFactory.create(AppModule);
app.useGlobalPipes(new ValidationPipe());
await app.listen(3000);
}
bootstrap();
|
然后安装class-validator:
1
| pnpm i class-validator class-transformer -S
|
同样是使用装饰器语法:
1
2
3
4
5
6
7
8
9
10
11
|
import { IsNotEmpty } from 'class-validator';
export class CreateUserDto {
@IsNotEmpty({ message: '用户名不能为空' })
username: string;
@IsNotEmpty()
password: string;
}
|
此时,我们重新发请求:
1
2
3
4
5
| curl --location --request POST 'http://localhost:3000/user' \
--header 'Content-Type: application/x-www-form-urlencoded' \
--data-urlencode 'password=123'
---------------------------------------------------------
{"message":["用户名不能为空"],"error":"Bad Request","statusCode":400}%
|
连接数据库
这里我们使用 TypeORM 作为我们的 ORM 框架。
ORM 是一种将对象模型与关系数据库之间进行映射的技术,通过 ORM 框架可以将数据库中的表和行映射到程序中的对象和属性。
安装依赖:
1
| pnpm i --save @nestjs/typeorm typeorm mysql2
|
准备好我们的数据库,然后在app.module.ts中注册 TypeORM :
1
2
3
4
5
6
7
8
9
10
11
12
13
14
15
16
17
18
19
20
21
22
23
24
25
26
27
28
29
| import { Module } from '@nestjs/common';
import { TypeOrmModule } from '@nestjs/typeorm';
import { AppController } from './app.controller';
import { AppService } from './app.service';
import { UserModule } from './user/user.module';
import { MenuModule } from './menu/menu.module';
@Module({
imports: [
UserModule,
MenuModule,
TypeOrmModule.forRoot({
type: 'mysql',
host: 'localhost',
port: 3306,
username: 'root',
password: '123456',
database: 'oss-nest',
synchronize: true,
retryDelay: 500,
retryAttempts: 10,
autoLoadEntities: true,
}),
],
controllers: [AppController],
providers: [AppService],
})
export class AppModule {}
|
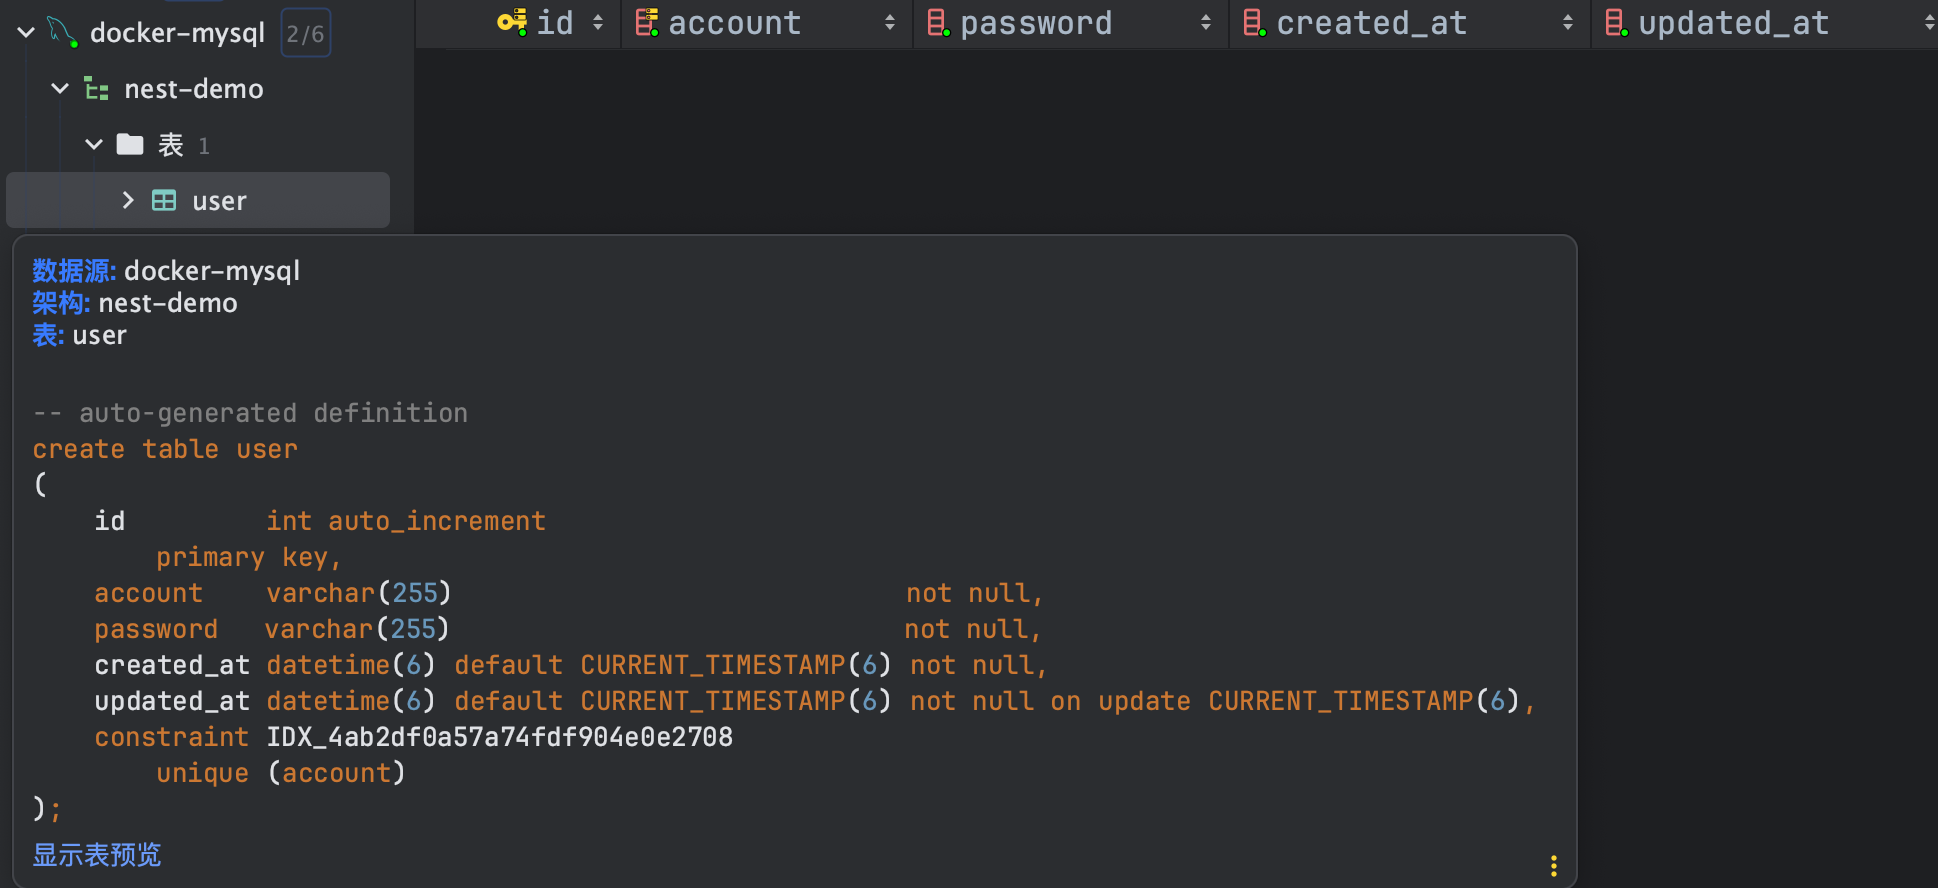
Entity 实体
在对象关系映射(ORM)中,实体(Entity)是指映射到数据库表的对象模型。在 ORM 中,实体通常与数据库表一一对应。每个实体类代表一个数据库表,在类中定义的属性(字段)对应表中的列,类的实例对应表中的行。通过ORM框架提供的功能,可以实现实体对象与数据库之间的增删改查操作。
这里我们以user为例:
1
2
3
4
5
6
7
8
9
10
11
12
13
14
15
16
17
18
19
20
21
22
23
|
import { Column, CreateDateColumn, Entity, PrimaryGeneratedColumn, UpdateDateColumn } from 'typeorm';
@Entity()
export class User {
@PrimaryGeneratedColumn()
id: number;
@Column({ name: 'account', unique: true })
username: string;
@Column()
password: string;
@CreateDateColumn()
created_at: Date;
@UpdateDateColumn()
updated_at: Date;
}
|
然后在user.module.ts中关联:
1
2
3
4
5
6
7
8
9
10
11
12
13
14
|
import { Module } from '@nestjs/common';
import { UserService } from './user.service';
import { UserController } from './user.controller';
import { TypeOrmModule } from '@nestjs/typeorm';
import { User } from './entities/user.entity';
@Module({
imports: [TypeOrmModule.forFeature([User])],
controllers: [UserController],
providers: [UserService],
})
export class UserModule {}
|
关联后,重启服务后实体就会同步到数据库中。
对数据库进行 CRUD 的一个例子
CRUD,即增加(Create)、读取(Read)、更新(Update)和删除(Delete)
在user.service.ts中注入:
1
2
3
4
5
6
7
8
9
10
| import { InjectRepository } from '@nestjs/typeorm';
import { Repository } from 'typeorm';
import { User } from './entities/user.entity';
export class UserService {
constructor(
@InjectRepository(User) private readonly user: Repository<User>,
) {}
...
}
|
然后就可以写对应的逻辑。
Create 增
1
2
3
4
5
6
7
8
|
async create(createUserDto: CreateUserDto) {
const user = new User();
user.username = createUserDto.username;
user.password = createUserDto.password;
return await this.user.save(user);
}
|
测试一下:
1
2
3
4
5
6
| curl --location --request POST 'http://localhost:3000/user' \
--header 'Content-Type: application/x-www-form-urlencoded' \
--data-urlencode 'username=1' \
--data-urlencode 'password=123'
--------------------------------------------------------------
{"username":"1","password":"123","id":1,"created_at":"2023-07-10T07:24:48.532Z","updated_at":"2023-07-10T07:24:48.532Z"}%
|
查看数据库:

数据库中也出现了对应数据,表示新增用户成功。
Read 读
查询一条
1
2
3
4
5
|
async findOne(id: number) {
return await this.user.findOne({ where: { id } });
}
|
测试一下:
1
2
3
| curl --location --request GET 'http://localhost:3000/user/1'
---------------------------------------------------------------
{"id":1,"username":"1","password":"123","created_at":"2023-07-10T07:24:48.532Z","updated_at":"2023-07-10T07:24:48.532Z"}%
|
分页查询
1
2
3
4
5
6
7
8
9
10
11
12
13
14
15
16
17
|
@Get()
findAll(@Query() query: { page: number; size: number }) {
return this.userService.findAll(query);
}
async findAll(query: { page: number; size: number }) {
const { page, size } = query;
const [users, total] = await this.user.findAndCount({
skip: (page - 1) * size,
take: size,
});
return { users, total };
}
|
测试一下:
1
| curl --location --request GET 'http://localhost:3000/user/?page=2&size=5'
|
1
2
3
4
5
6
7
8
9
10
11
12
13
14
15
16
17
18
19
20
21
22
23
24
25
26
27
28
29
30
31
32
33
34
35
36
37
38
39
40
| {
"users": [
{
"id": 6,
"username": "例工般",
"password": "92780",
"created_at": "2023-07-10T07:41:25.090Z",
"updated_at": "2023-07-10T07:41:25.090Z"
},
{
"id": 7,
"username": "百提同",
"password": "5766884758",
"created_at": "2023-07-10T07:41:25.760Z",
"updated_at": "2023-07-10T07:41:25.760Z"
},
{
"id": 8,
"username": "号消米发具",
"password": "483747755",
"created_at": "2023-07-10T07:41:26.358Z",
"updated_at": "2023-07-10T07:41:26.358Z"
},
{
"id": 9,
"username": "全要色院",
"password": "6442764",
"created_at": "2023-07-10T07:41:27.017Z",
"updated_at": "2023-07-10T07:41:27.017Z"
},
{
"id": 10,
"username": "接去度件路",
"password": "7585781",
"created_at": "2023-07-10T07:41:27.582Z",
"updated_at": "2023-07-10T07:41:27.582Z"
}
],
"total": 13
}
|
Update 改
1
2
3
4
5
|
async update(id: number, updateUserDto: UpdateUserDto) {
return await this.user.update(id, updateUserDto);
}
|
测试一下:
1
2
3
4
5
6
| curl --location --request PATCH 'http://localhost:3000/user/1' \
--header 'Content-Type: application/x-www-form-urlencoded' \
--data-urlencode 'username=123' \
--data-urlencode 'password=123'
----------------------------------------------------------------
{"generatedMaps":[],"raw":[],"affected":1}%
|
查看数据库:

可以看到,数据已经更新成功了。
Delete 删
1
2
3
4
5
|
async remove(id: number) {
return await this.user.delete(id);
}
|
测试一下:
1
2
3
| curl --location --request DELETE 'http://localhost:3000/user/1'
----------------------------------------------------------------
{"raw":[],"affected":0}%
|
查看数据库:
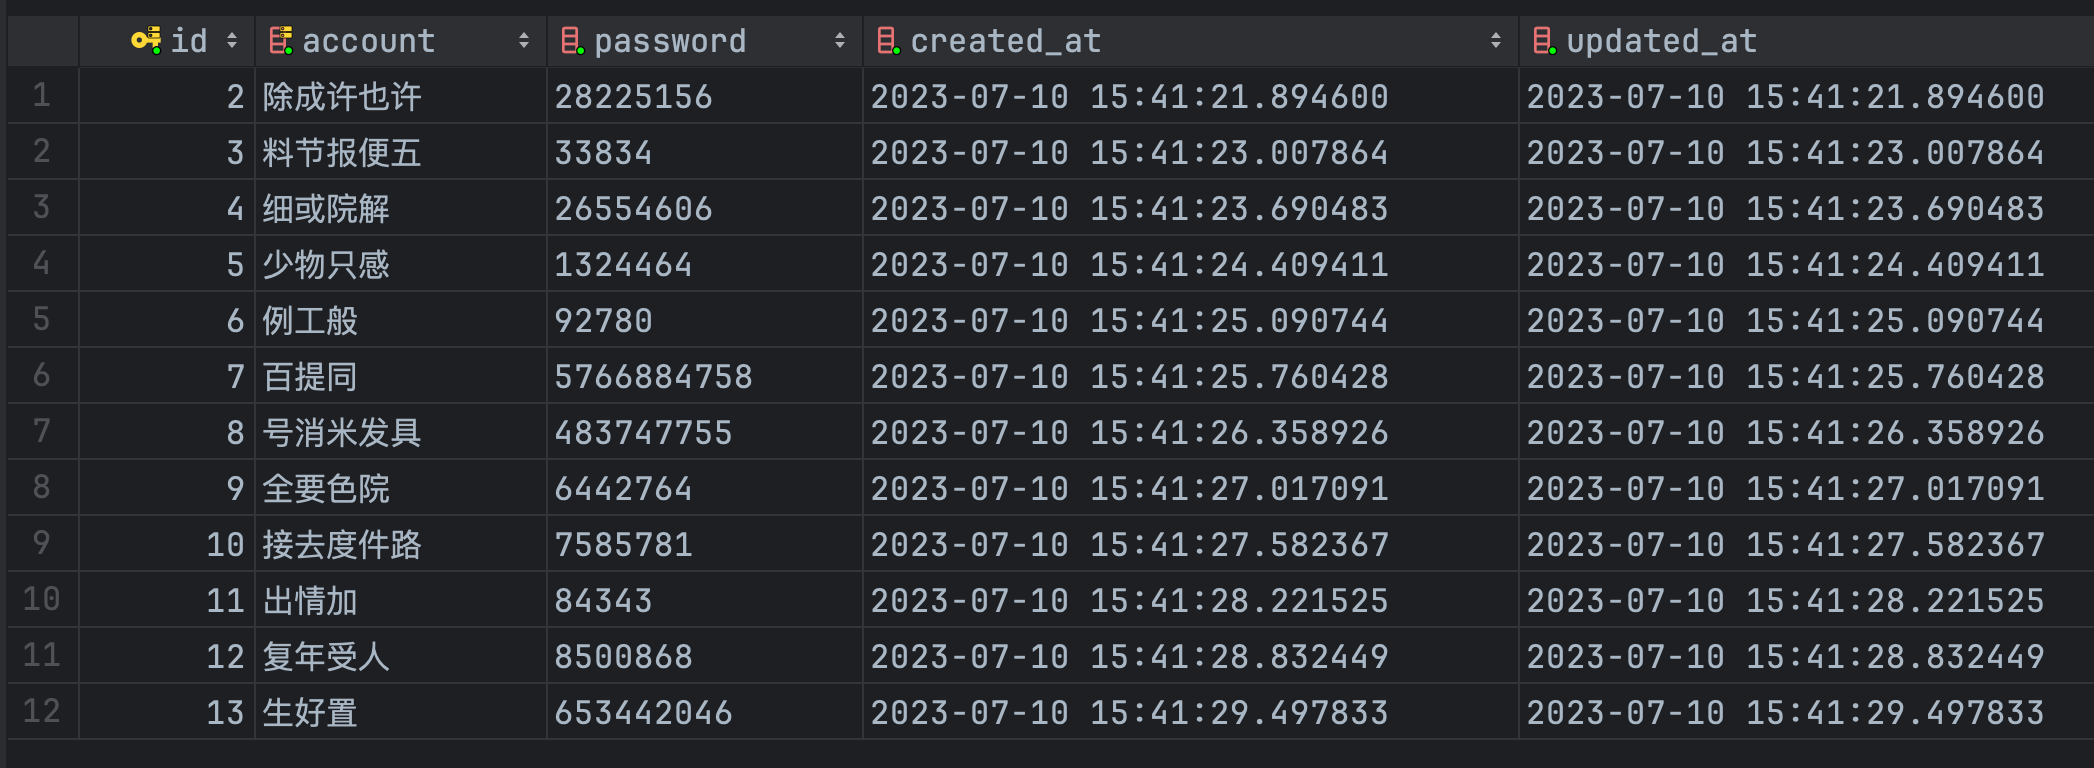
可以看到,id 为 1 的数据已经被删除了。
后记
笔者也是刚刚接触 Node ,目前还存在诸多不足,如果文章中有任何错误,欢迎在评论区批评指正。
Nest学习系列博客代码仓库 (github.com)
冷面杀手的个人站 (bald3r.wang)
NestJS 相关文章